Simulation#
In the most common case, you add appropriate controllers for one or more robots, either by sub-classing or by assigning callbacks.
Then, you set up the world, adding as many objects as needed.
Finally, you may run and visualize the simulation in real time, or in batch-mode with pyenki.World.run() or by calling pyenki.World.step() in a loop.
Minimal Thymio#
In this example, two Thymio robots exchange IR messages, which we log at each time step. This is the Python equivalent to the C++ example
import math
from typing import cast

import pyenki


def log(thymio: pyenki.Thymio2, time: float) -> None:
    events = thymio.prox_comm_events
    if not events:
        return
    print(f"At time {time:.1f}, Thymio {thymio.name} received msgs")
    for e in events:
        print(
            f"- value: {e.rx_value}, payloads: {e.payloads}, intensities: {e.intensities}"
        )


def main() -> None:
    dt = 0.1
    world = pyenki.World()
    for i, (x, theta, tx) in enumerate(
            zip((100, 115, 130), (0, math.pi, 0), (111, 222, 333),
                strict=True)):
        thymio = pyenki.Thymio2()
        thymio.name = f"#{i}"
        thymio.position = (x, 100)
        thymio.angle = theta
        world.add_object(thymio)
        thymio.prox_comm_enabled = True
        thymio.prox_comm_tx = tx
    print("Start Simulation")
    for i in range(15):
        world.step(dt)
        for robot in world.robots:
            log(cast('pyenki.Thymio2', robot), dt * i)
    print("End Simulation")


if __name__ == '__main__':
    main()
Hello Thymio#
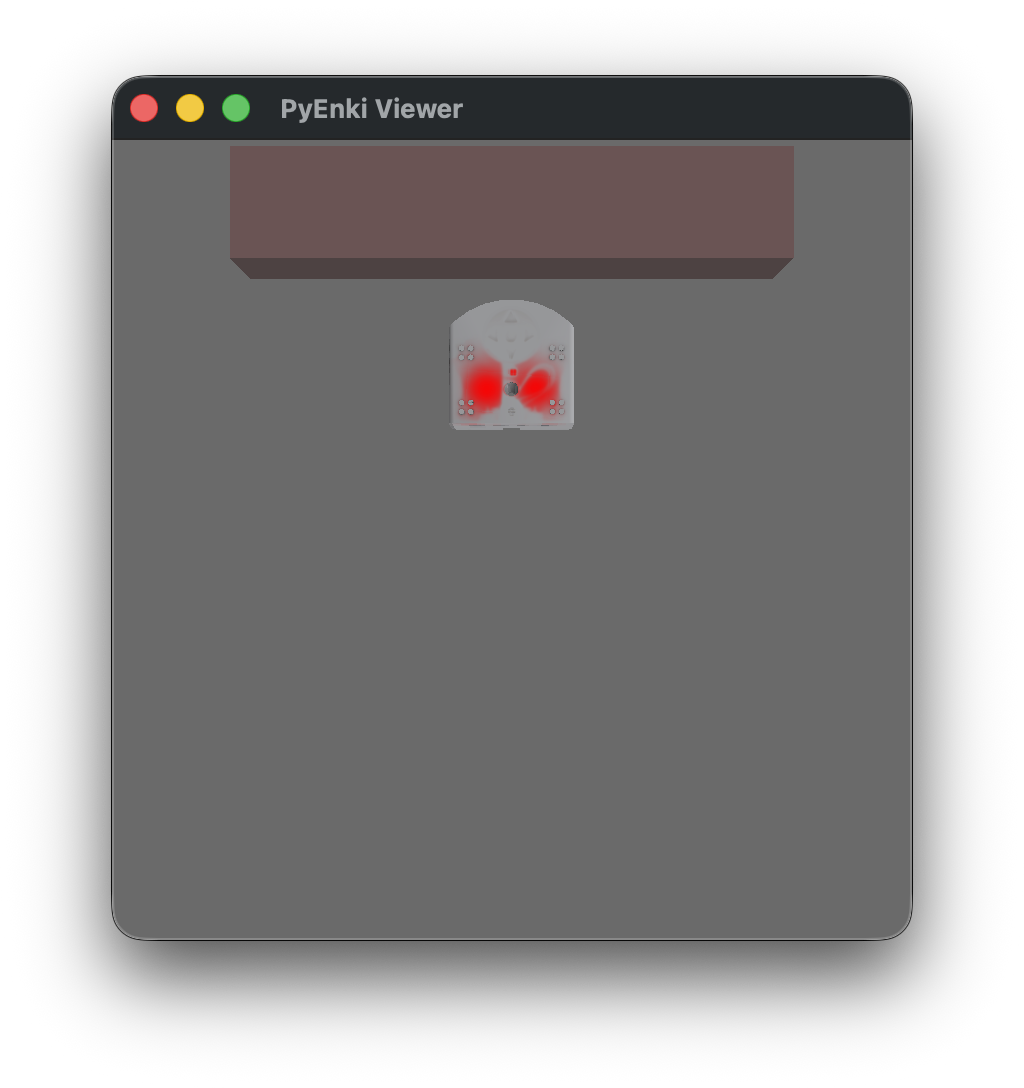
In this example, a Thymio will advance as long as there is not an obstacle (a wall) in front of it, when it will stop and switch the LED color to red from green.
import math
import sys
from typing import TYPE_CHECKING, SupportsFloat

import pyenki

if TYPE_CHECKING:
    from pyenki.viewer import CameraConfig


# The world update step will call `control_step` automatically
class ControlledThymio2(pyenki.Thymio2):

    # This is the method we have to overwrite
    # to implement a controller.
    def control_step(self, time_step: SupportsFloat) -> None:
        # Check if there is an obstacle in front of us
        value = self.prox_values[2]
        if value > 3000:
            # A lot of light is reflected => there is an obstacle,
            # so we stop and switch the LED to red
            speed = 0.0
            self.set_led_top(red=1.0)
        else:
            speed = 10.0
            self.set_led_top(green=1.0)
        self.left_wheel_target_speed = speed
        self.right_wheel_target_speed = speed


def setup() -> pyenki.World:
    # We create an unbounded world
    world = pyenki.World()
    # We add a Thymio at the origin,
    # which can optionally use Aseba-like units and types.
    thymio = ControlledThymio2()
    thymio.position = (0, 0)
    thymio.angle = 0
    world.add_object(thymio)
    # and a wall a bit in forward, in front of the Thymio.
    wall = pyenki.PhysicalObject(lx=10,
                                 ly=50,
                                 height=5,
                                 mass=1,
                                 color=pyenki.Color(0.5, 0.3, 0.3))
    wall.position = (30, 0)
    world.add_object(wall)
    return world


def main(duration: float = 10, dt: float = 0.1) -> None:
    gui = '--gui' in sys.argv
    video = '--video' in sys.argv
    ortho = '--ortho' in sys.argv
    world = setup()
    camera_config: CameraConfig = dict(camera_position=(0, 0),
                                       camera_altitude=70.0,
                                       camera_yaw=0.0,
                                       camera_pitch=-math.pi / 2,
                                       camera_is_ortho=ortho)
    if gui:
        import pyenki.viewer

        # We run a simulation [in real-time] inside a Qt application
        pyenki.viewer.run_in_viewer(world,
                                    time_step=0.1,
                                    walls_height=10,
                                    duration=duration,
                                    **camera_config)
    elif video:
        import pyenki.video
        import pyenki.viewer

        # We generate a video
        v = pyenki.video.make_video(world,
                                    time_step=0.1,
                                    walls_height=10,
                                    duration=2,
                                    width=1280,
                                    height=720,
                                    **camera_config)
        v.write_videofile('hello_thymio.mp4', fps=30)
        pyenki.viewer.cleanup()
    else:
        # We write our own loop to run the simulation as fast as possible.
        steps = int(duration // dt)
        print(f'Simulating {steps} steps')
        for _ in range(steps):
            world.step(dt)
        print('Finished simulating')


if __name__ == '__main__':
    main()
Launching it with --gui will visualizes a real-time simulation.
while running it with the --video generates this video
Thymio Buttons#
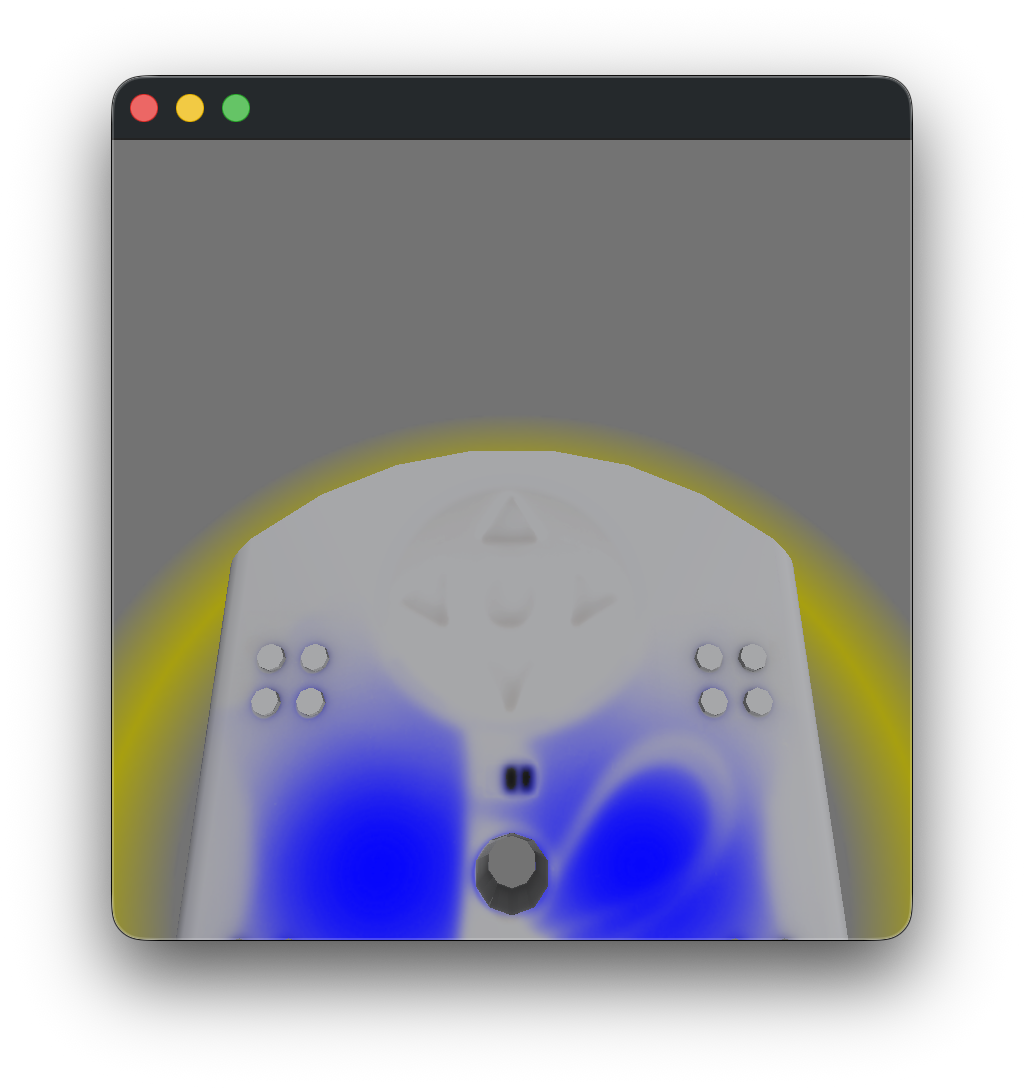
In this example, a Thymio will react to buttons. Try to press any button to change its color.
import pyenki
import pyenki.viewer


def on_button_touch(thymio: pyenki.Thymio2,
                    button: pyenki.Thymio2.Button) -> None:
    if button == pyenki.Thymio2.Button.CENTER:
        thymio.set_led_top(0, 0, 0)
    if button == pyenki.Thymio2.Button.FORWARD:
        thymio.set_led_top(1, 0, 0)
    if button == pyenki.Thymio2.Button.BACKWARD:
        thymio.set_led_top(0, 1, 0)
    if button == pyenki.Thymio2.Button.LEFT:
        thymio.set_led_top(0, 0, 1)
    if button == pyenki.Thymio2.Button.RIGHT:
        thymio.set_led_top(1, 0, 1)


def main() -> None:
    world = pyenki.World()
    thymio = pyenki.Thymio2()
    thymio.button_touch_callback = on_button_touch
    world.add_object(thymio)
    pyenki.viewer.init()
    viewer = pyenki.viewer.WorldView(world=world)
    viewer.move_camera(target_distance=20,
                       target_position=(8, 0),
                       pitch=-1.2,
                       yaw=0)
    viewer.show()
    viewer.start_updating_world(0.1)
    pyenki.viewer.run()


if __name__ == '__main__':
    main()
Thymio Behaviors#
In this example, a group of Thymio runs a controller that replicates one of the behaviors implemented in the Thymio firmware.
import math
import sys

import pyenki
import pyenki.video
import pyenki.viewer
from pyenki.adapters import Thymio2AsebaAdapter

from thymio_behaviors import (AccBehavior, Chain, ExplorerBehavior,
                              FollowerBehavior, LEDButtonsBehavior,
                              LEDProxBehavior)


def make_world() -> pyenki.World:
    world = pyenki.World(radius=50, seed=4)
    rng = world.random_generator
    behaviors = (AccBehavior, ExplorerBehavior, FollowerBehavior)
    for _ in range(7):
        thymio = pyenki.Thymio2()
        thymio.position = (rng.uniform(-30, 30), rng.uniform(-30, 30))
        thymio.angle = rng.uniform(0, 2 * math.pi)
        behavior_cls = rng.choice(behaviors)  # type: ignore[arg-type]
        behavior = Chain(LEDProxBehavior(), LEDButtonsBehavior(), behavior_cls())
        aseba = Thymio2AsebaAdapter(thymio)
        aseba.set_behavior(behavior)
        # last line is equivalent to
        # thymio.control_step_callback = aseba.make_controller(behavior)
        world.add_object(thymio)
    world.run(2, 0.033)
    return world


def main() -> None:
    pyenki.viewer.init()
    world = make_world()
    camera_config: pyenki.viewer.CameraConfig = dict(camera_altitude=55,
                                                     camera_pitch=-0.8,
                                                     camera_yaw=0.7,
                                                     camera_position=(-50,
                                                                      -50))
    if '--video' in sys.argv:
        v = pyenki.video.make_video(world,
                                    time_step=0.033,
                                    duration=60,
                                    width=1280,
                                    height=720,
                                    factor=2,
                                    **camera_config)
        v.write_videofile('thymio_behavior.mp4', fps=30)
    else:
        pyenki.viewer.run_in_viewer(world,
                                    time_step=0.033,
                                    duration=-1,
                                    **camera_config)
    pyenki.viewer.cleanup()


if __name__ == '__main__':
    main()
Running the script with the --video flag generates this video:
Thymio line following#
In this example, a Thymio follow a line using thymio_behaviors.LineFollowingBehavior that replicates controllers implemented in the firmware. It also show how to apply a texture to the ground.
import pathlib as pl
import sys

import numpy as np
import PIL.Image
import pyenki
import pyenki.video
import pyenki.viewer
from pyenki.adapters import Thymio2AsebaAdapter
from thymio_behaviors import LineFollowingBehavior


def make_world() -> pyenki.World:
    path = pl.Path(__file__).parent / 'line_following_ground.png'
    im = np.asarray(PIL.Image.open(path).convert('RGBA'))
    ground_texture = pyenki.World.GroundTexture(im)
    world = pyenki.World(lx=200, ly=200, ground_texture=ground_texture)
    thymio = pyenki.Thymio2()
    thymio.position = (110, 100)
    thymio.angle = 0
    aseba = Thymio2AsebaAdapter(thymio)
    aseba.set_behavior(LineFollowingBehavior())
    # last line is equivalent to
    # thymio.control_step_callback = aseba.make_controller(LineFollowingBehavior())
    world.add_object(thymio)
    return world


def main() -> None:
    pyenki.viewer.init()
    world = make_world()
    camera_config: pyenki.viewer.CameraConfig = dict(camera_altitude=105,
                                                     camera_pitch=-1.15,
                                                     camera_yaw=0.0,
                                                     camera_position=(50, 100))
    if '--video' in sys.argv:
        v = pyenki.video.make_video(world,
                                    time_step=0.033,
                                    duration=60,
                                    width=1280,
                                    height=720,
                                    factor=2,
                                    **camera_config)
        v.write_videofile('thymio_line_following.mp4', fps=30)
    else:
        pyenki.viewer.run_in_viewer(world,
                                    time_step=0.02,
                                    duration=-1,
                                    **camera_config)
    pyenki.viewer.cleanup()


if __name__ == '__main__':
    main()
Running the script with the --video flag generates this video: